Tulips & Forget-me-nots
 |
| Tulips & Forget-me-nots |
It is finished!
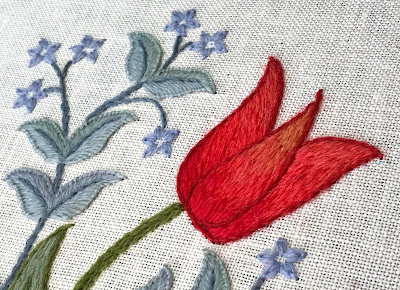
When I embroidered the first tulip, I was briefly worried that I may have misjudged just how bright the coral reds for the flowers were... were they going to be too 'in your face'?
The darker outline toned it down a little bit, so I decided to push on and stitched a couple more.
I am glad I did. Cheerful red tulips.
They are embroidered in long & short stitch with four shades coral red, two of them being from the new colours released by Appltons yarn (681 and 982), rich watermelon red tones which I have been really looking forward to finding a use for. To define the petals, I outlined them in stem stitch with a slightly darker red.
I did learn the hard way that I should have left the bright red tulips to the very last. Although I was super careful, I got tiny red fibers stuck in other colours and because they are so bright, they stood out like a sore toe and I had to carefully pick them out with fine tweezers.
The forget-me-nots are stitched in a very pale lilac. They were lovely and quick to do which made a nice change after all the more time consuming flowers and leaves.
~ ~ ~ ~ ~ ~ ~ ~ ~ ~ ~
Rhodes Stitch
The Rhodes stitch is mostly (to my knowledge) used in counted work. When stitched in a circle, it is a fabulous stitch for small, raised dots, especially when using wool, and is much quicker to do than padded satin stitch.
1) Place a straight stitch across the circle from A to B for the first stitch.
Bring the thread to the front to the left of A and take the needle to the back to the left of B.
2) Pull the thread through. The stitch will cross the first stitch at the center of the dot.
Bring the thread to the front to the left of the previous stitch and take the needle to the back on the other side of the dot, to the left of the previous stitch.
3) Continue to stitch around the circle in a counter clockwise direction so all the stitches cross in the center. Keep the stitches close together on the outline.
4) Continue until the circle is filled. The last stitch will fall next to the first stitch.
~ ~ ~ ~ ~ ~ ~ ~ ~ ~ ~
From this...
...to this.
 |
| Tulips & Forget-me-nots |
It is happy and cheerful, structured but slightly wild and I couldn't be happier with the result.
It reminds me of my mum. She used to let her forget-me-nots self-seed everywhere and what I didn't realise before I started this embroidery was that this is exactly how my mum's tulip beds looked in spring. Isn't if funny how memories like that creep into the things we create?
I took the embroidery off the frame this morning. It was so tightly stretched but will still need to be blocked before I make it into something. I would like to make some kind of case to hold my (very messy) pile of knitting needles, but looking at it now, I think it might be too big for that so now I am not sure what to make of it. Any suggestions?
...and Yes, it will be a kit, but..
I need you to please be patient. It will be a little while. This design is going to be part of a bigger project I am working on - I will tell you more about that later.
I hope you have a lovely weekend and perhaps even find time to pick up your needle or something else you enjoy.
Best Stitches,
Anna X


It's a really lovely design and such beautiful colours!
ReplyDeleteThank you so much Lyn :)
DeleteBeautiful, colorful and elegant :)
ReplyDeleteThank you Meri. I hope you are keeping well.
DeleteWow! That is gorgeous!!! Of course the Red is "in your face"! Red tulips are exactly that way in the spring after the long dead winter! I LOVE your design. It looks exactly like my tulips did this past spring... the bent and twisted with the rain... but held their petals beautifully! I tried to comment on your last post and couldn't make it post... so fingers crossed for this one! :):)
ReplyDeleteHi Betsy, what is it about tulip? We are lucky to live in an area in Australia with cooler winters so I can grow tulips. Mine never look this good though LOL.
DeleteBeautiful blog
ReplyDeleteI love the color pallete. The flowers look amazing.
ReplyDelete